KMDuino Capacitance Meter - Home design Capacitance Meter Shield for use with KMDuino
MKII
This month we visit a design done by Jonathan Nethercott, an Electronic Systems Engineer who has dabbled in things with microprocessors for a long time. Jon has a blog where he posts his projects and I stumbled across it looking for interesting projects for us to build. One of these is a capacitance meter which I have built and tested and I am quite happy with the results. It is great for measuring small caps where the markings are not legible (especially as I age and my eyesight gets worse).
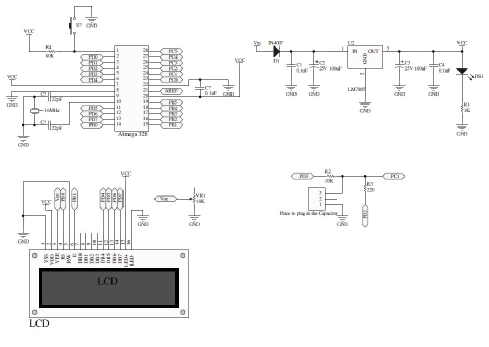
The circuit diagram below is pretty self explanatory and should be easy to read.
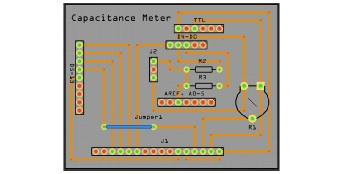
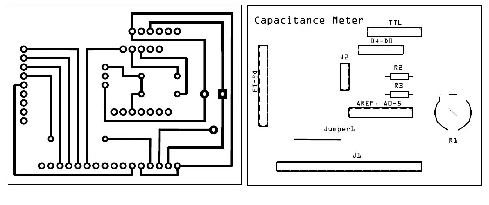
I have created a KMDuino Shield for the project and the artwork as usual is available from my website and listed at the bottom of the article. If you would like to have an UNO shield designed, please let me know and I will see what I can do HI.
Components
The component count on this project is minimal and all we need is a few resistors for the reference input, the reset circuit, the backlight if used (I have not used the backlight to save on current drain nor have I included a reset as I can use the rest on the KMDuino) and the LCD contrast. R1 – 10K trim pot, R2 – 10K 1/4W, R3 – 220R 1/4W and R4 – 10K 1/4W. One mini switch for the reset and that is it.
Construction
Start with soldering the resistors on the board, next the header pins to plug into the KMDuino and LCD. At this stage check all connections for shorts and bad soldering, once happy proceed to solder the LCD interface making sure of the orientation of pin1.
Plug the KMDuino into your PC, load the sketch and you have an autoranging capacitance meter. J2 is the input for measuring capacitance values and pin 1 is the positive side for polarised capacitors. Keep probe leads short.
The sketch is available on my website with the artwork as mentioned above.
PCB – http://www.zs6kmd.za.net/capmeter.rar
Sketch – http://www.zs6kmd.za.net/capmeter.txt (open text file, copy and save as capmeter.ino)
There you have it, another successful project that you can use in your radio shack. I hope you are enjoying the series with us and that you will send pictures and stories of your projects to us at projects@zs6kmd.za.net for inclusion in future articles.
Happy Building